Download - Instructions Manual with Specs & Warranty

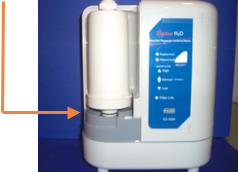
Installation Instructions for the Pre-Filter and Post-Filter for the Model ES-2000
Download - Instructions for Replacing the Filters
The Filter Kit has two types of filters enclosed.
1 Pre-Filter and 3 Post-Filters.
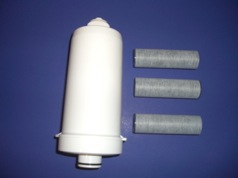
Under general use, the white Pre-Filter will be replaced after every 15,000 liters of water has been processed through the unit and the gray Post-Filter will be replaced after every 5,000 liters of usage.
Approximating from the filter life, we can determine that for one Pre-Filter that is used, three Post-Filters will be used in the same interval. Each time a customer orders the Filter Kit, the box will contain one Pre-Filter and three Post-Filters.
Instructions on replacing the Pre-Filter
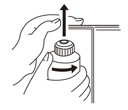
1. The left-hand cover is removable. Please firmly-but-gently press up on the cover to remove it.
2. The picture below shows the cover removed and the Pre-Filter in view.
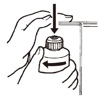
3. To remove the Pre-Filter, turn it counter-clockwise and gently-but-firmly push up the filter
The picture below shows the Pre-Filter lifted from its base.
4. With the Pre-Filter removed, please insert the new Pre-Filter into the filter base as illustrated below and turn clock-wise to insure a secure fit.
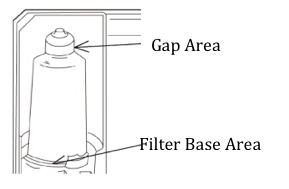
5. After having inserted the new Pre-Filter, please perform the following step.
-While viewing the new Pre-Filter, please start the water flow and observe the following areas to ensure that there are no water leaks.
6. Please run the tap water for approximately 5 minutes to ensure the internal contents of the new filter has been properly washed.
If steps (5)and (6) are complete, the unit is ready for use.
7. Please slide the left-hand cover back onto the unit.
Instructions on replacing the Post-Filter
The Post-Filter is attached to the hose which returns the electrolyzed water from the unit to the Faucet Adapter.
- Please firmly-but-gently unscrew the center portion of the Post-Filter cartridge to be able to remove the cartridge from its canister.
- The following 3 pictures show the sequence of required steps.


Turn clock-wise Pull center apart. Remove and
to separate. replace used cartridge
- With the new cartridge in the canister, screw the two canister halves together by turning it clock-wise.
- While observing the new Post-Filter, please start the water flow and observe the connectors to ensure that there are no water leaks.
The Post-Filter replacement is complete. Please run the water for approximately 2 minutes to ensure proper cleaning of the cartridge prior to the use of the unit.
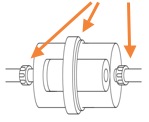
Lever Settings on HM Faucet Adapter
Lever Settings on HM Faucet Adapter_Wullaert_2015